

In the world of professional video editing, there is a secret to making your work feel "expensive" without spending a dime: the split edit. While the jump cut is great for energy, the split edit, specifically the J-cut and the L-cut, is what makes your video feel natural, cinematic, and professional.
Here is everything you need to know about these essential techniques and how to stop doing them manually.
What are J-Cuts and L-Cuts?
These edits are named after the shape they create on your editing timeline. Instead of cutting the audio and video at the exact same time, you offset one of them.
The J-Cut (The "Audio Lead")
In a J-cut, you hear the next scene before you see it.
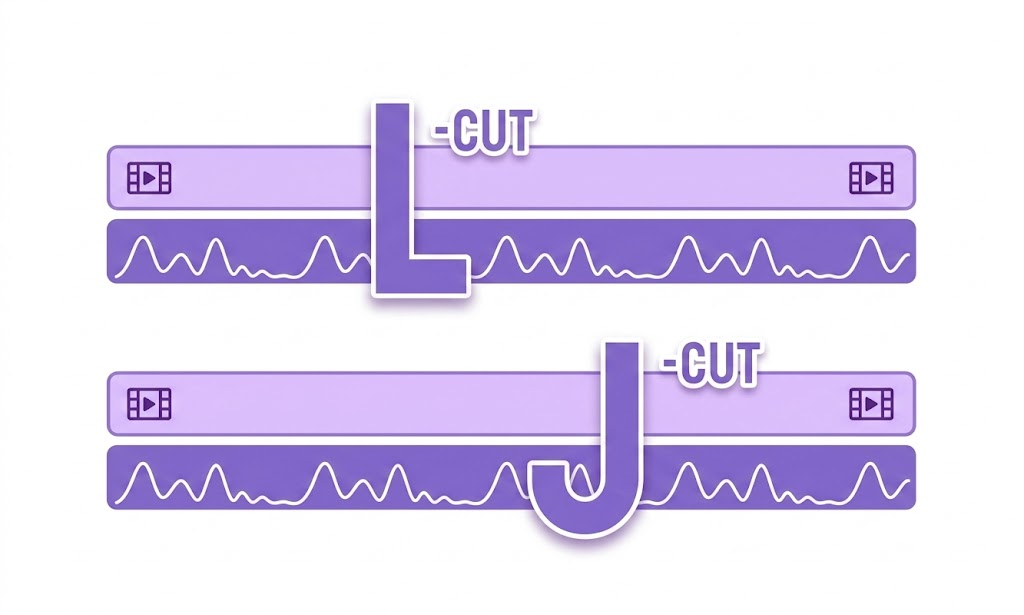
- The Look: It looks like the letter "J" on your timeline because the audio clip extends to the left, underneath the previous video clip.
- Why use it: It prepares the audience for a change in setting or speaker. It’s the most natural way to transition because, in real life, we often hear something before we turn our heads to look at it.
The L-Cut (The "Visual Lead")
In an L-cut, the audio from the current shot continues even after the video has switched to the next shot.
- The Look: It looks like the letter "L" because the audio clip extends to the right, trailing under the new video clip.
- Why use it: It’s perfect for showing a reaction. If Character A is talking, you can switch the video to Character B to show their reaction while Character A’s voice continues.
When to Use and Avoid Them?
J-cuts are best used when you want to introduce a new speaker or a sudden change in setting, such as a flashback or a dream sequence, as they prepare the audience mentally for the shift. However, you should avoid them if you are specifically aiming for a "jumpy," frantic YouTube-style aesthetic where jarring transitions are part of the brand. L-cuts, on the other hand, are perfect for reaction shots or montages. They keep the flow feeling continuous and smooth. You should only avoid an L-cut if the audio from the first scene is distracting or completely irrelevant to the new visual you are introducing.

FireCut AI:
The irony of J-cuts and L-cuts is that they make a video feel "seamless," but creating them is anything but. Manually dragging audio handles for every single cut in a 20-minute video can add hours to your workflow.
FireCut is an AI-powered plugin for Premiere Pro and DaVinci Resolve that automates the manual labor of making cuts. It was designed by Ali Abdaal and his friend Suhail Idrees to speed up the editing workflow for video creators. So it is specifically designed to take the heavy labor off your hands. Let’s see how FireCut can help you with your daily workflow:
- Silence Removal: When FireCut removes silences from your footage, it doesn't just do "hard cuts." You can set a J-cut offset (typically 1–10 frames) so the audio leads the video automatically.
- Rough Draft Cleaning: You can polish the rough draft by cutting out filler words, repetition,, and profanity in just a few clicks. FireCut cuts the unnecessary parts out of your video smoothly.
- Podcast Editing: In multi-track mode, FireCut can automatically create L-cuts by showing the listener’s reaction while the speaker is still talking.
If you want your videos to stop looking like "amateur vlogs" and start looking like "content," you need to stop cutting audio and video at the same time. Use J-cuts to lead your audience and L-cuts to show their reactions.
By using FireCut, you can apply these cinematic "split edits" across your entire timeline in a single click—saving you hours of tedious trimming while making your final product look like it was edited by a Hollywood pro.
Ready to stop manual trimming? Try FireCut and let the AI handle the offsets for you.